
Modacity has also set up a special page for readers of the blog to get a discount on a lifetime subscription to their app (a very good deal!). You can check it out here and support both Modacity and the blog.
I’ve been a fan of incorporating digital tools into my practicing for years.
The Old Days
Back in the nineties, I would wander the halls of Northwestern University, lugging around a large duffel bag filled with a camcorder, metronome, tuner, MiniDisc recorder, microphones, and a crazy tangle of wires and cables. It would take me 15 minutes just to set all this stuff up in my practice room, and if there were any problems with the outlets in the room, I was hosed!
These Days
Times have changed a lot since then, and I’ve graduated through several generations of technology to my current setup of a 12.9 inch iPad Pro and my aging but still reliable iPhone 6S Plus. I also use an AirTurn Duo Bluetooth foot pedal to turn pages, and an Apple Pencil for taking notes, and the Apple Keyboard Case to protect my device and to turn it into a wicked laptop-like device.
Let’s kick things off with a deep-dive into two apps that are helping me tremendously: Modacity and forScore. Here’s a look at how I’m using both of these apps for both my teaching and my playing.
Modacity – my practicing buddy
I was contacted by Modacity after Liz Li, the Head of Community & Customer Success at Modacity, heard an episode of my podcast with Lauren Pierce about practicing. Lauren recently put together an online course that digs deep into the concept of effective practice, and this ties in so clearly to what Modacity is doing with their app.
Liz let me know about Modacity, a new app that is kind of a “Swiss Army knife” for music practicing. For me, this app offers two major categories of benefits:
1. Modacity has all the practicing tools that I use in one place
The details are really well thought through in terms of what tools to include and how they function. Modacity CEO and founder Marc Gelfo is a horn player who used to play with the Hong Kong Philharmonic and is now a regular extra player with the San Francisco Symphony.
It’s obvious that a musician thought carefully through all the details in the functionality of this app.
Tools include:
- Recording and playback functionality – this extremely well-implemented feature has cause me to record myself much more than usual
- The “metrodrone” – a cool combination of drone and metronome, with the ability to drone and click at the same time, easy access to rhythmic subdivisions, an intuitive tempo tap feature, and more
- A multi-functional timer that records how much time you spent on every element of practicing and the easy ability to set timers for specific practice items
- Stats tracking of your practicing, much like apps like Strava do for working out
- Note taking for each practice item
Playlists of practice item sequences for your practice sessions
- Set a notification for your next practice session
- The ability to reach out and ask a practice-related question to the Modacity team – this is built into the app and is super-cool!
- Reminding you when you’ve been playing for a while and it’s time to take a break
These tools are amazing all on their own… but Modacity also serves a deeper purpose:
2. Modacity encourages mindful practicing
What the heck does “mindful practicing” mean?
Put simply, it’s the act of being cognitively engaged the practicing process, being “in the moment” and practicing what you actually need to practice in a results-oriented way.
Modacity’s Deliberate Practice Mode
Modacity actually has a mode specifically designed for deliberate practice. Here’s Marc demonstrating how to use the mode:
Here are the primary ways that Modacity encourages better practicing:
1. Deliberate practice mode
The “artificial intelligence” mode of this feature guides you through a few questions in deciding what you actually need to work on for a specific piece. It then presents you with a few questions to help guide you toward a specific goal. You then record yourself practicing toward that goal, listen back, and evaluate yourself. These moments of deliberate practice are tracked in your practicing history, and looking back on these moments in your history can give you good insight into how well you’re moving toward your overall goals.
2. Intelligent layout of timer and recording button
These might seem like small user interface details, but the fact that the default practicing screen features a timer in motion plus a recording button really helps to focus your attention on the amount of time you’re spending on something. I’ve even notices with my students that they seem to be more attentive as they see that timer ticking away in their lessons, and having that easy record and listen back functionality front and center encourages makes getting into recording extremely easy.
3. Rating each item you practice after you finish working on it
Modacity requires that you enter a 1-5 starter rating after finishing work on each practice item. If you’re honest with Terese ratings, you’ll be amazed at how easily you can target what needs work the most and what is in good shape in your practice items.
4. Archiving all your past saved recordings
It can be hard to notice progress on a day-to-day basis, but it’s remarkable how obvious progress can be when listening to recordings spaced weeks or even a month apart. I love saving select red recordings of a piece and then going back and listening to what has gotten better. talk about a confidence boost in my problem-solving abilities!
Marc has also written a bunch of great blog posts on the topic:
- 5 Ways to Create Healthy and Effective Practice Habits
- Why It’s Incredibly Important to Rate Your Mastery
- The Critical Importance of Visualization in Music Practice
- A Musician’s Guide to Overcoming Performance Anxiety
- Note Taking – Tips and Strategies for Musicians
- How Using Playlists Can Improve Your Music Practice
- Why It’s Important to Record Yourself During Your Practice
- 5 Practice Mistakes and How to Avoid Them
- 5 Common Pain Points Among Musicians
- 4 Steps to Relaxing During Practice
- Finding a Balance: Practicing Specific Music With Instrument Skills
Marc and I also dig into the concept of deliberate practice in our podcast interview:
How I’m implementing Modacity in my practicing
This app has a flexibility and intuitiveness that allow for many approaches to practicing. Here are a few ways in which I use the app on a regular basis:
My “daily routine” list
This is my default practice list for any generic day. These are the items that I’d like to go through for both short and long-term reasons. This list assumes that I have 2-3 hours of practicing available to me on that day and that I’m not preparing for something specific and impending like a recital or audition.
My daily routine list consists of the following:
- Technique items I’m currently working on
- My “most urgent” practice items, either solo or orchestral
- Non-urgent solo practice items
- Non-urgent orchestral practice items
- Something fun that I can play through and record for style
My “in a hurry” list
If you’re like me, there are a lot of days where you have extremely limited practice time. Even though there’s still a lot I can accomplish in 30-60 minutes, I often used to say “what’s the point?” to myself and blow off practicing for the day.
I’ve found that building a more compact 30 minute or 60 minute list ready to go for when I’ve got days like that to be a lifesaver. I set timers of 5-10 minutes until I hit my 30 or 60 minute total, pick up my instrument, and Modacity guides me through these items. I find that I get a lot accomplished even though I’m short on time.
Recital or audition lists
Modacity excels in getting you on coursed for an upcoming major event like a recital or audition. You can get extremely granular in Modacity and build a practice item for each excerpt or even parts of excerpts and solos. Mix and match in as granular a fashion as you like, and Modacity will track your progress on all of these practice items.
How I’m Using Modacity in the Private Lesson
I’ve also found Modacity to be a great tool in private lessons. These days, I open up a playlist called ‘lessons.’ I’ve only got one item in there right now called ‘lesson recordings,’ though in the future I might experiment with actually building a playlist for my students for the lesson and working through each item.
Marc has also written a post with advice on how you can use Modacity in lessons.
Here are the three primary Modacity features I use in lessons:
1. Metrodrone
Having the Metrodrone at my fingertips is incredibly useful. I find myself using both the drone and the metronome much more with Modacity open than I do otherwise in teaching. Practicing with both a drone and a metronome has been a part of my life for decades, and it’s something that I find important to instill in my students.
2. Recording
Finally, having that recording button staring at us throughout the lesson has made me much more likely to record during the lesson, and it has, for whatever reason, made my students much less skittish about being recorded.
So frequently, students get flustered whenever I record during the lesson, but something about the way that Modacity integrates the feature seems to keep them from balking. With Modacity, it seems to make recording just another practicing tool, like using a tuner or metronome.
3. Listening back
As soon as the student stops playing, Modacity immediately plays the recording back. I may play the recording in its entirety back to the student, but more frequently we’ll pause the recording and talk about something. We may not even get through the entire recording. Also, we may record a few bars again, try recording something with the metronome or drone. Recording becomes more objective with Modacity, which is a beautiful thing for sure.
forScore – my insanely useful digital library
About forScore
ForScore has been on the scene since the early days of the iPad. I remember purchasing it way back on my first generation iPad. While I found it useful, I had a hard time totally embracing it until getting my iPad Pro.
Since upgrading to the iPad Pro, forScore has become one of my most valuable apps, and I use it for hours each day while teaching, practicing, and conducting.
Making forScore into a killer music platform
Combining the large screen of the iPad Pro, the Apple Pencil, and a Bluetooth foot pedal along with forScore makes this setup insanely useful. There’s no problem reading music on the iPad Pro since it’s pretty much exactly the size of a strand and 8 1/2 x 11 “ piece of paper. The Apple Pencil allows you to take notes on music in all kinds of ways and then export that annotated music out to students.
Using the Apple Pencil
ForScore was a useful app back in the early days of the iPad. I remember using it to organize my music on the first generation iPad, and Ive enjoyed watching the feature set develop over the years.
The addition of the Apple Pencil to the iPad lineup really changed the game for apps like forScore. While there were numerous styluses on the market prior to the launch of the Apple Pencil, in practice they were tough to use.
Having the incredible response of the Apple Pencil makes marking up scores a breeze. I actually finding myself marking up music more than I used to in the past. I use different colors to indicate different things, I take copious notes on how the piece is going, tempo levels reached, and other such information. Knowing that I can easily erase anything I mark without any messy erasing has been a real game changer for me.
Getting music into forScore
Whenever I tell a friend that I’m going paperless for music, the first question is “how the heck do you get your music scanned?”
It’s a good question, and it’s not an easy task. I have a few tools that have made this process easier, but making a major push into digital takes a lot of time.
What I used to do
I bought my first printer/scanner back in the early 2000s, and after getting inspired to digitize some of my library, I spent the bulk of a couple of weeks in front of the scanner, painstakingly scanning each page. Just thinking about hat time makes my back ache!
Over the years, I scanned my music little by little, until I finally had a good collection of PDFs of what I use form teaching. My more recent music purchases have been digital whenever possible, and I’ve been known to stay up later at night perusing IMSLP and other free digital music resources as well.
What I do now
There are lots of apps for using your phone or tablet to scan music, but my favorite for years has been Scannable. It’s owned by Evernote, which I’ve used as my project management tool for over a decade. It does a really good job scanning music, and it makes it pretty much as quick as using a single page scanner.
Before diving into forScore, I had existing PDF libraries on Dropbox, Google Drive, Evernote, and iCloud. While moving all of that into forScore might seem daunting, in reality it’s not that bad. There are several import options available through forScore, but I ended up syncing Google Drive and Dropbox to my forScore app and individually transferring what I wanted.
It’s easy to open up a PDF in forScore using the share button. This makes moving files between other apps a breeze.
You can also use forScore’s ‘darkroom’ feature to create a PDF of a part directly in the app itself. I use this in teaching situations a lot, taking screenshots of student orchestra music in darkroom during coachings and then adding it to that school‘’s setlist.
Organizing your music in forScore
So you’ve got you’re music in forScore. Great! Now what?
There are a ton of options to title, tag, and categorize your music. All music lives in a non-hierarchical file system (think Gmail), and using search, tags, and other metadata allows for nearly infinite organizational customization.
1. Setlists
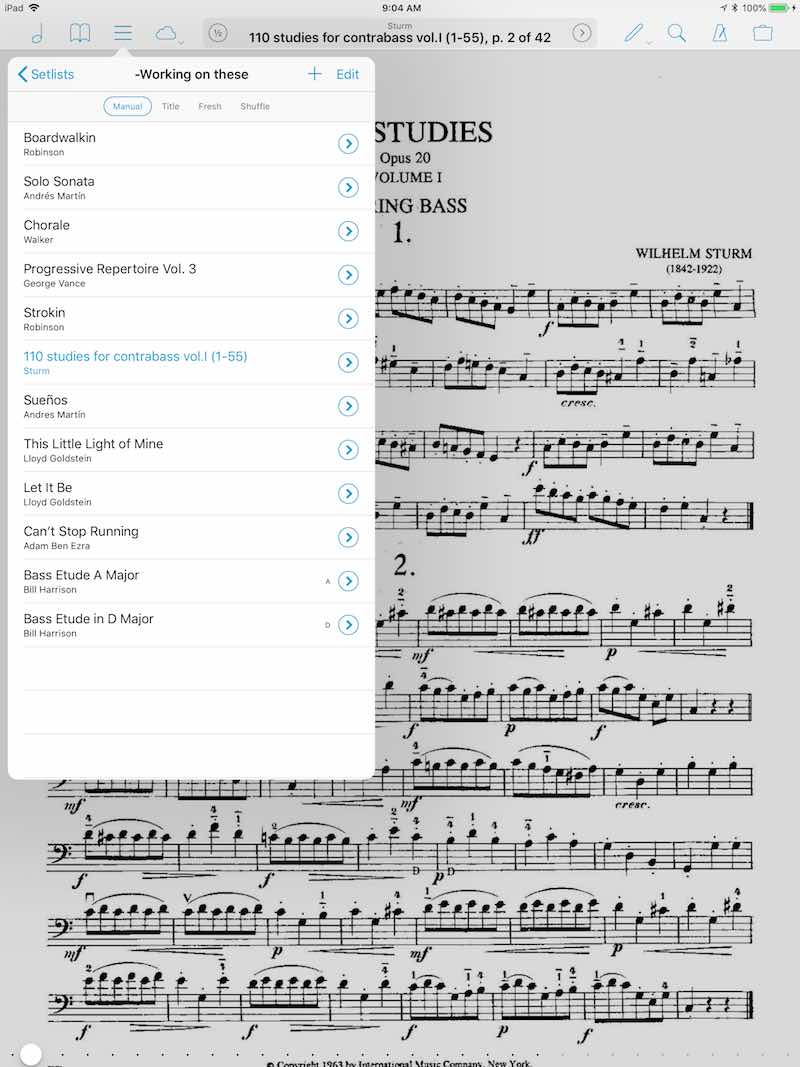
For me, the key feature to first understand is building a setlist. This is a great way to organize music for a specific event, to sort out solo parts from orchestra scores, and much more.
Really, you could just use setlists and call it a day. For years, I never organized anything beyond the setlist level. More on that in a bit!
2. Adding titles, composers, genres, and tags
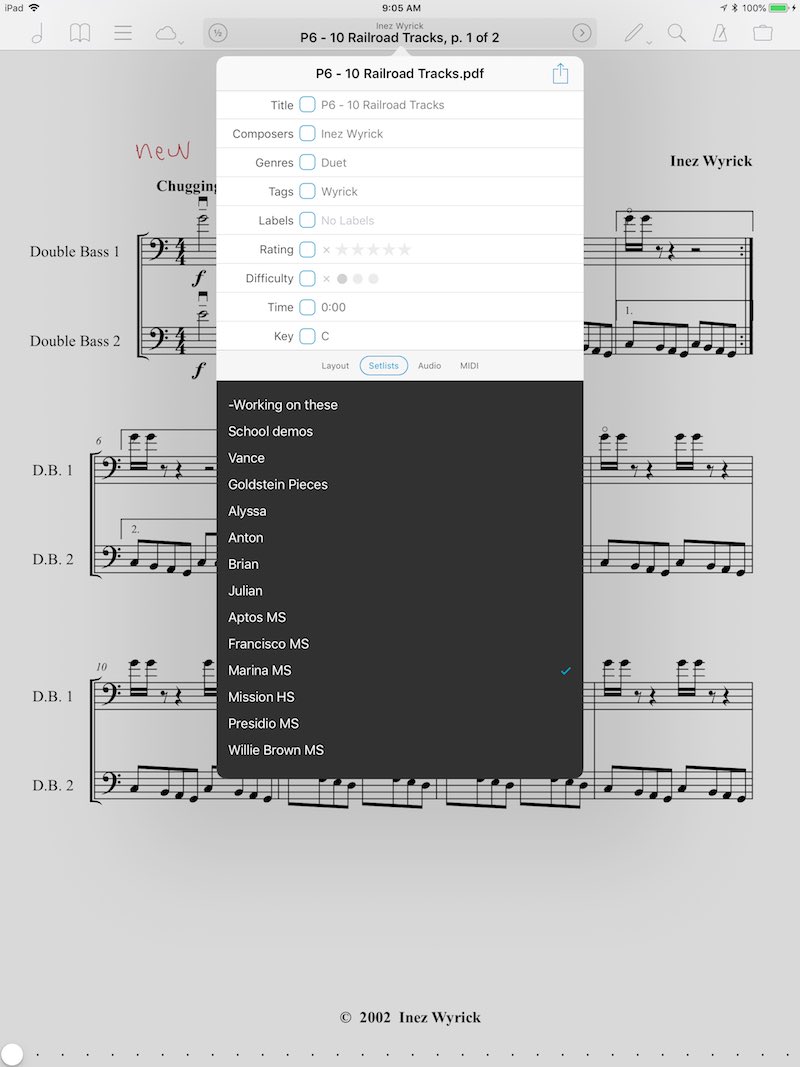
For quite some time, I only organized my forScore titles using setlists. As long as the title was comprehensible and was in a setlist, I was good. This is a totally reasonable way to use the app. However, adding in more information to your library opens up a whole new world of usefulness.
After deciding to go “all in” on forScore for my music, I decided to start adding more information. I added in composer, organized in into genres like orchestra music, etudes, method books, sonatas, concertos, and the like.
I also started adding tags as a sub-level of information, like bossa, swing, or bop for jazz tunes, thumb position for upper position-focused exercises, and shifting for shifting-related etudes. Tags are really flexible and are a great way to tailor forScore to make it the most useful for you.
All this metadata is searchable. The more metadata you add, the better it gets. In that way, it’s a bit like Evernote, another one of my “can’t live without” apps. As soon as you bite the bullet and start adding metadata, the usefulness of having this data becomes evident. Now, finding a specific style of exercise, related material in the same key, or a slow movement from a sonata is a breeze.
3. Understanding and creating bookmarks
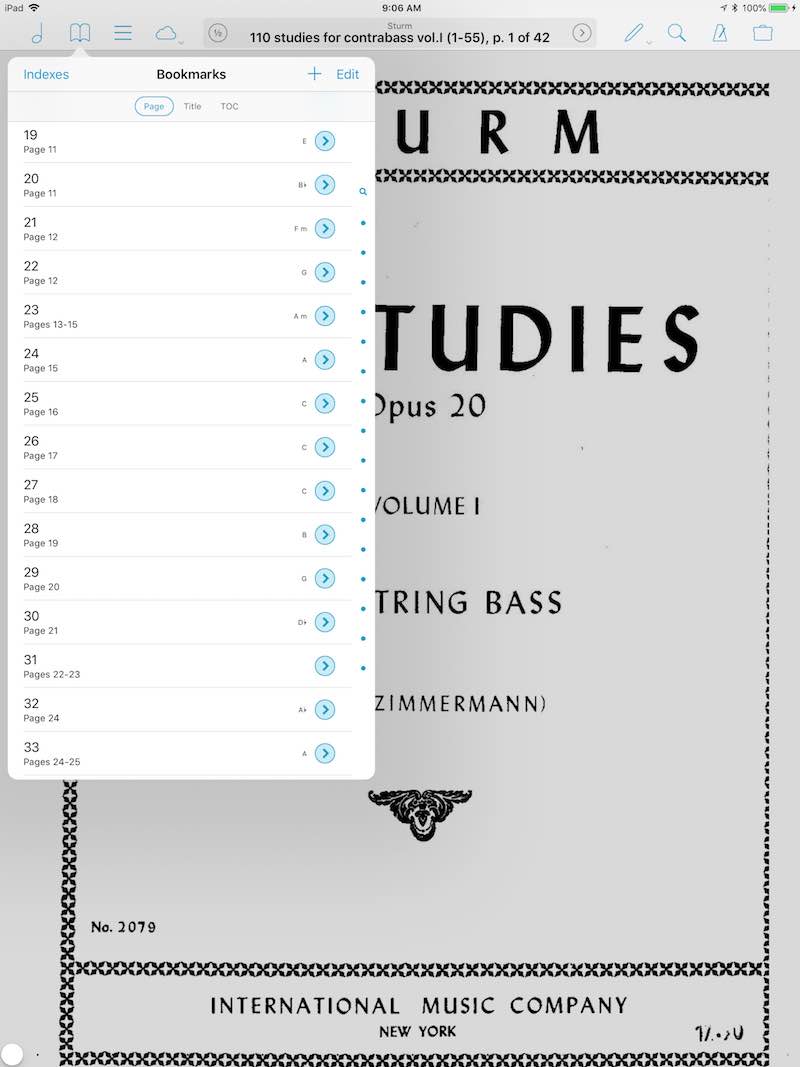
Another killer feature of forScore is bookmarking. There are two styles of bookmark in forScore, and they take a little getting used to when you’re starting out:
Simple bookmarks – add a start page, but leave the end page blank – appears as a hollowed out arrow (show this)
More advanced ‘virtual file’ bookmarks – this is really the ‘secret sauce’ for bookmarks. By adding a start and an end page, you create a bookmark that is treated like a separate piece of music. That means that you can add it to a setlist, export it out as an annotated PDF, and create multiple copies of it for use with different students. Each of these bookmarks has their own set of metadata.
Use examples for advanced bookmarks:
- go through the Real Book and label each tune by title, composer, style, and key
- mark out each etude in a book and categorize by key and difficulty
- divide technical exercises into keys, teach issues, etc.
- bookmark the individual movements of a piece
- bookmark all the tricky passages of an upcoming recital and make a setlist using just those passages
4. Adding difficulty, key, and rating
Adding in difficulty, key, and rating are the ultimate final steps in usefulness for me in terms of teaching. This way, I’m able to quickly sort out my bass duets and find just the easy ones in G major. You’d be amazed at just how useful having all of this at your fingertips is when you’re trying to move quickly in a lesson or coaching!
What using forScore in a private lesson looks like
I started using forScore for teaching the day I first bought my iPad Pro, and I use it for every single lesson in some capacity. Having my entire music library available to me at any time really is incredible, and as a result I find myself assigning much “deeper cuts” to students than normal.
For each student, I create a playlist for them and add everything that we’re working on to that playlist. I’ll even drag the items around int eh playlist to create a priority list for that specific lesson.
I use the ‘rearrange’ tool in forScore to create a copy of a PDF for a specific student. That way, I can write in notes just for them, erase stuff they don’t need don’t need. This is an indispensable feature if you use the same materials for multiple students.
During the lesson, I have my Apple Pencil in my hand for adding fingerings, Boeing’s, circling expressive marks, and writing in notes. I use the blunt end as a pointer to follow along for younger students. You’re in for a world of hurt if you try using either the “pointy” end of the Apple Pencil or your finger. Try it once and watch the hilarity ensue in the lesson. The Blount end of the Apple Pencil triggers nothing, and it makes for a great “pointer stick.”
I’m also frequently opening up the onscreen piano keyboard and playing along with my students. I’ve found the clarity, timbre, and rhythmic incisiveness of the piano to be a great aid in teaching, and I’ve gotten pretty good at pointing to a bar of music on the page while playing along on the keyboard!
After the lesson, if we’ve added a lot of notations to the parts, I’ll export the entire setlist as an annotated PDF and email it to the student… and their parents if they’re on the younger side! This is a great way to keep everyone on the same pager in terms of what we’ve been doing in lessons.
Integrating Modacity and forScore – why two devices are better than one
For years, I tried to carry only one device for both practicing and teaching. I loved the ideas of using just one device, but over time I realized the practicality of using my phone in conjunction with my iPad.
Both forScore and Modacity can be run on the iPad, and there is a forScore Mini available for iPhone as well. In theory, I could run everything on my iPad and not involve the phone. However, I find that running Modacity on the iPhone and forScore on my iPad allows each app to do what it does best and work in tandem with each other.
I keep Modacity open on my iPhone and my iPad open to forScore, with both of them sitting on my stand. Also, I have my AirTurn foot pedal in front of me to handle page turns.
Final Thoughts
I find Modacity to be a wicked practicing buddy, working in subtle ways to keep me focused and working on what really needs address.
ForScore is my digital music library, allowing me instant access to anything I might ever need. It also sports killer features for teaching. I can take notes, duplicate a piece for multiple purposes, and share in a lot of useful and time-saving ways.
This is a reminder that Modacity has set up a special page for readers of the blog to get a discount on a lifetime subscription to their app (a very good deal!). You can check it out here and support both Modacity and the blog.
Bass News Right To Your Inbox!
Subscribe to get our weekly newsletter covering the double bass world.