
It goes without saying, but a lot of us musicians are finding themselves stuck at home for the next few weeks… or months, even. All of our playing work has evaporated, and we are seeing those impending bills.
That’s the bad news. There’s no sugar-coating it–it’s bad.
The good news, however, is that most of us musicians also teach, and there are a bunch of ways to get going teaching your lessons online without breaking the bank.
Maybe you’ve never taught a lesson online in your life. That’s ok–this guide can help.
You may have tried a few options in the past but were frustrated by the results. No worries. We’ll be covering gear recommendations that you can use to level up the quality of what you’re doing.
Two key factors to keep in mind
For all online one-on-one teaching, there are two major things that will determine the quality of the session:
- How strong the internet connection is on both ends (student and teacher)
- The quality of the audio gear being used
Having good video is great, of course, and I’ve got a few tips below for getting better-looking video for lessons.
For music lessons, however, having a good microphone and headphones will make the difference between your online lessons being a breeze versus a torture session.
Start with the gear you’ve got
As with everything in life, the better the gear you’re using, the higher-quality result you’ll get. But don’t worry—even if you’ve just got a phone, tablet, or laptop, you can get a quick & dirty setup to keep those lesson dollars coming in.
If we’re stuck in this pandemic for the next several months (hopefully not, but who knows…), that might be a good time to take a portion of that teaching income and buy a starter microphone and decent headphones.
Part 1: ways to connect online with students for lessons
There are a lot of tools out there for connecting with someone over video, and they continue to grow and evolve over time.
1 – Zoom

My current favorite method is Zoom. It’s free to use for one-on-one video chats, is available for Mac, PC, and mobile devices, and it seems to be the most stable platform.
Both you and your students need to download the Zoom app and create an account. This is easy and quick. You’ll also need to know the email that the student is using for their account.
You can schedule a Zoom meeting (aka lesson) to start at a given time, and you invite your student to that meeting via email. This email link will automatically open up the Zoom app (or prompt them to download it if they haven’t done so).
Zoom will then ask both you and your student which video source and audio source to use. If you’re a total newbie and only have your phone, tablet, or laptop, no worries. You’ll be able to see and hear your student just fine.
Also, this excellent post from Eric Heidbreder covers how to use the actual sound of the microphone, rather than the compressed “made for speaking” default setting from Zoom.
Another great thing about Zoom is that the teacher can record the lessons on their computer. This doesn’t work on the mobile version of Zoom, but if you’re using your desktop or laptop, you can just click the record button and it will save the lesson to your hard drive.
You could then upload the lesson to YouTube as an unlisted video for your student to reference or use it in another fashion. What a cool and useful feature!
2 – Skype

Skype is another service that’s free to use and is available on pretty much all devices.
I’ve been using Skype for what seems like forever. It has definitely gone through good and bad phases in terms of reliability. These days, I find it to be pretty reliable.
Since Skype, which is currently owned by Microsoft, has been around for so long, it’s likely that your student (especially if they’re an adult or from outside the United States) has used it before. If so, this eliminates the need of having to create a new account for them.
Personally, I find it easier to just start a Skype call with someone as opposed to scheduling it in Zoom. Also, having to check my email for the Zoom link (and inevitably lose attention by stuff in my inbox) is kind of a drag.
However, most musicians I know get more reliable results with Zoom. Skype seems to have a “bad day” now and then, even if both internet connections are rock solid. Zoom seems to be more consistent overall.
Also, Skype has this weird delay effect that can occur where things slow down for a bit and then catch up all at once. This isn’t so annoying when speaking, but it can make teaching a lesson challenging or even impossible if it’s really acting up.
There’s also no way to natively record Skype calls, though you can get paid add-on programs like eCamm Call Recorder to record them. If you’re going to do that, however, why not just do the same thing for free on Zoom?
3 – FaceTime
FaceTime is only available on Apple products. If you and your student are both Mac, iPhone, or iPad users, connecting with FaceTime is a breeze.
“Mac folks” (and I count myself as one of these) tend to use FaceTime a lot for other purposes, so there’s a higher degree of familiarity with it than with Zoom or Skype. That goes a long way toward making lessons a smooth experience and eliminates the frustrations of serving as tech support for your students.
FaceTime seems to be close to Zoom in terms of quality, and it doesn’t tend to have that frustrating latency quality that Skype can occasionally have. I use it for teaching and love it.
Also, there’s no way to natively record the lesson in FaceTime, though you can hack around with ScreenFlow or another such program to get around that.
4 – Facebook Messenger

The FB Messenger internet “pipes” have been really good in recent years, and I frequently get audio and video results that approach Zoom.
A huge advantage to using Messenger is that most of your students will be familiar with it. A major disadvantage, especially if you’re teaching younger students, is that you’re connecting with them through this social network.
There’s also no way to natively record these calls, though you can always find a way with a screen casting program like ScreenFlow.
Part 2: free ways to get better audio and video
OK—you’re all set to go with one of these services. Here are two tips that will immediately result in better video and audio.
1 – Lighting
Position yourself in front of a window, and put your phone/laptop between you and the window.

If there’s no convenient window, turn on some lights behind your phone or laptop, and make sure that there aren’t any bright sources of light directly behind you. This will cause all sorts of strange shadows to appear and will make it hard for your student to see you.

2 – Camera placement
If you’re using a laptop, put it on your desk and move back enough so that you are in frame with your instrument.
If you’re using a phone or tablet and happen to have a camera tripod for it, that’s awesome. Mount that phone on the tripod and get yourself in frame.
If you‘re reading this “newbie” guide, however, it’s likely that you have no tripod… but I’ll bet you’ve got a music stand! Put that phone on the music stand, aim it so that you’re in frame, and if possible try to have the microphone on your phone uncovered.

More tips
Here are a few additional random things that I’ve discovered about teaching lessons online:
- Playing together doesn’t really work. Try it and you’ll see what I mean!
- The pacing of your our lessons probably needs to change a little to account for the online connection. Let a little more space elapse between you and the student so you don’t talk over each other.
- Make sure you’re on WiFi, and that your student is as well!
- Have them get as close as possible to the WiFi source in their house (same for you also).
Part 3: getting better gear
After a few weeks of teaching using only the microphone and speaker on your phone, tablet, or laptop, you’ll probably be tearing your hair out over the sound quality. Sure, you can hear rhythm, and pitch with just the built-in stuff on your device, and that can take you pretty far in a lesson.
Once you start trying to work on nuances of sound, phrasing, dynamics, articulation, and the like, the limitations of the built-in mic and speaker will be screamingly obvious.
Upgrading your gear can be relatively cheap, and it’s possible that you have some things laying around the house that you didn’t even realize would make a difference for your online teaching.
1 – Headphones
Using the built-in speaker and the built-in microphone for your device causes all kinds of strange background noise. Putting on headphones will clean up a lot of that.
Ideally, you want both you and your student to be wearing headphones, but I’ve found that even if only you are wearing headphones, you’ll get better results.
Here are a few headphone options that I’ve used, along with their advantages and disadvantages:
- iPhone headphones or equivalent with mic – These work surprisingly well considering how flimsy they seem. The biggest issue with using these is how short the cord is. Unless you’re doing vocal lessons, these probably wont work.
- AirPods or equivalent Bluetooth headphones – These will work much better than the built-in speaker, and there’s no worry about being tethered to a short cord. Just make sure you charge up before the lesson or you may find yourself running out of juice!
- Audio Technica MX50 – These headphones have been favorites for musicians for a long time. I love using these for podcasting, recording, listening to music, and teaching online lessons. They come with three different cords, and the coiled cord works particularly well for me when teaching on my bass. The earpieces swivel, so you can easily wear them on your neck or have just one headphone on to be able to hear your student and yourself. You can teach all day in comfort with these.
I also enjoy using my Bose noice-canceling headphones in many situations, and they work well for teaching if you turn the noice cancellation off. The battery life is great on these, but they’re speedy, so unless you have a pair sitting around, the cheaper options listed above will get you good results.
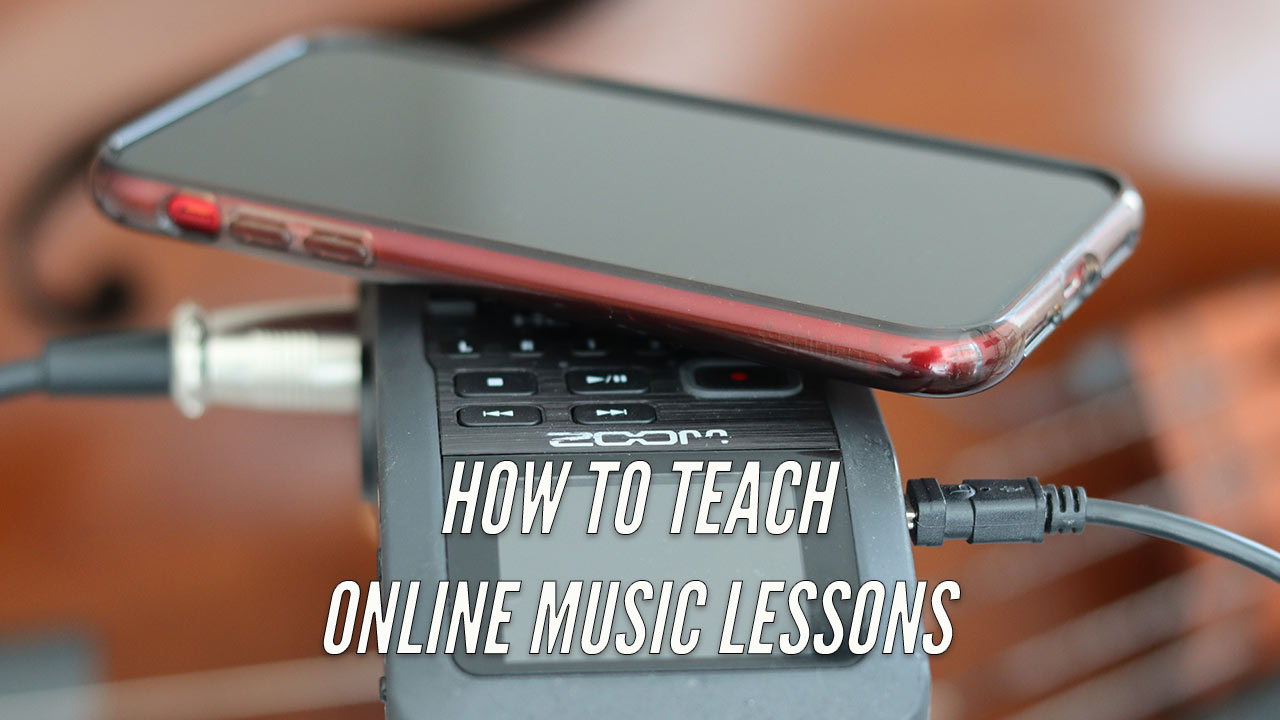
2 – Microphones
Getting a microphone will dramatically improve your audio. Microphones get really expensive really fast, but even a $25-50 USB mic will help improve your audio.

One big thing to keep in mind: professional microphones use an XLR connection, while cheaper consumer microphones may use USB or 1/8” jack connections.

Other mics will offer both USB and XLR, and a few mics are also designed specifically with Lightning connectors for iOS devices.
My quick guide:
- Using your laptop or desktop? Get a USB mic.
- Using an iOS device? Get a Lightning mic.
- Using an Android device? Check your inputs – you may be able to use either an 1/8 “ mic or a USB-C mic depending on your device.
- Want to future-proof yourself and be able to expand in the future? Consider a Zoom product.

Here are thoughts on some mics that I’ve used. Keep in mind that I’m a podcaster and not an audio engineer, so while I like these, this might be kind of a goofy list to some folks.
- ATR 2100 (USB or XLR) – This mic is affectionately referred to as the “podcaster’s best friend.” It frequently retails for around $60, and it sounds great for voice and music. This mic features both USB and XLR inputs, so you can use it with your computer but also with an audio interface if you end up upgrading in the future.
- Zoom microphones (USB or XLR) – I love Zoom products. I’ve used everything from the H2 to the H6 and have never had any issues. The audio is great and the build quality is solid. Also, the H4 and above can also be used as audio interfaces so that your can connect multiple XLR microphones to the device. Very cool!
- Apogee MiC (Lightning) – At around $300, this is not your cheapest option, but it sounds great! It’s a small mic that hooks directly into your iPhone or iPad and works like a charm.
- Shure SM58 (XLR) – These “rock & roll” mics have been around forever, and they can take a beating and still work great. It’s possible that you have some of these floating around and don’t even realize it. The downside is that you need an audio interface, so this is not necessarily the best option for beginners. I’ve used them for years for all kinds of things and swear by them.
Another place I’d recommend for microphone comparisons is Marco Arment’s excellent podcast microphone comparison guide.
Final Thoughts
All of this gear advice will apply to your student as well. At a minimum, see if you can get them wearing headphones. If you can find a way to get them on a microphone, that’s even better. Send them a link to some of these mic options and see if your can at least get them on an entry-level USB or Lightning microphone.
These are tough times for all of us, but if there’s any way to put a positive spin on it, it might be that you’ll come out not he other side of this with a new set of skills and new ways of connecting with your students.
Let me know if you have any additional thoughts and/or recommendations for folks just getting into this online teaching thing!
Bass News Right To Your Inbox!
Subscribe to get our weekly newsletter covering the double bass world.
Quick plug for JLAB’s Studio BT headphones. About $30, and it has 30 hour battery life. Sound is quite good, too, so it’s a great value. They’re on-ear, which probably helps with hearing oneself play without having to nudge one of the phones off your ear. Anyway, thanks for the great how-to, Jason!
You bet, Phil, and thanks for the recommendation!
If you are using your phone with an external microphone and AirPods, does the phone automatically choose the AirPods or external microphone as it’s audio input source? I would love to use the two simultaneously.
I’m pretty sure you can if you’re using Zoom or Skype. It definitely works on the laptop, but I haven’t tested it on the iPhone.
Got a message from Tobyn, but the email bounced back to me. Here’s what I wrote:
Hi Tobyn,
Thanks for the message! Yeah, low frequency response is an issue on phone mics and built-in mics.
Ideally, you’d want a mic for your voice and one for the bass. That also means you’d need an audio interface, so this all gets expensive really fast.
I’m not much of an expert, but what I do is wear headphones, use a Zoom H6 with their omnidirectional mic on a low stand, and with a Shure SM58 plugged into the Zoom and on a mic stand for my voice. This picks up the bass really well, and I don’t have to crane down to try to talk into the Zoom.
This video has me demonstrating my setup (start at 22:41): https://youtu.be/-YdSe7r8fFs
I don’t have any experience with using an amp. I imagine there’d be feedback issues if you were too close to it, though.
I’m sure there are a ton of other options, but I have always had good results with anything from Zoom for the bass.
I hope that helps!
Sincerely,
Jason
Hello Jason
Great Article. I have a question. I have just enrolled with ZOOM and was trying to teach a music lesson online. My setup is a Macbook Pro, connected to an audio interface and a condenser mic. With all audio settings correct, when I start the lesson the student hears a crackling on his end, making it impossible for me to use this set up. Alternatively when I go back to use my Apple AirPods, it works fine but the audio quality is compromised.
Do you think using audio interface with condenser mic is using a lot of bandwidth? Would a USB mic be better? Or am I missing something?
Your guidance would be appreciated.
THanks just a small comment the picture is of a zoom H5 🙂
On second tought you are right it is a Zoom h6…..
Other question, did you consider tools like Sofasession or Jammr?
Hmmm… that’s a tough one. I’d maybe try connecting over Skype one time with your student to see if it’s a Zoom issue.
Otherwise, maybe try swapping out the cords (USB cord, XLR cable) or putting a different mic into the audio interfaced if you have one? I’ve had some buzzing issues (strangely) if my XLR cable is too long and is coiled on top of itself. Not sure why that was an issue, but using a shorter cable cleaned that up.
Otherwise, I’d try a USB mic or a different audio interface. There’s probably something out of whack for Zoom in the gear chain between mic and computer, I’m guessing.
I’ll let you know if I hear of a better solution!
Never tried them-—feel free to leave a description of them if they’re good services for you!
I am generally intimidated by “techy” sound stuff and I found this post and video super helpful and user friendly. I stumbled upon it trying to get better sound for multiple people singing in an open mic style performance event over Zoom. Just wanted to say thank you for putting this content up. You’re awesome.
That’s great—I’m so glad you found it helpful!
Thanks for the article! In an effort to replace accompanying my students live at lessons I started a YouTube channel with some of my backing tracks that they can play along with at lessons. This way there is no lag on my end. Any teacher can do the same really. By way of example you can check it out here: https://www.youtube.com/channel/UCszovSrOzjhkRob5YxJRIFg/
It’s a great way to do it, Chris—thanks!