
With the spread of COVID-19 and the resultant social distancing, everything we musicians have taken for granted has been upended. Gigs are canceled. Teaching is canceled. Tours are canceled.
Musicians accustomed to teaching in person are suddenly grappling with new challenges surrounding online teaching.
Last week, I put out a blog and video for people new to teaching lessons online.
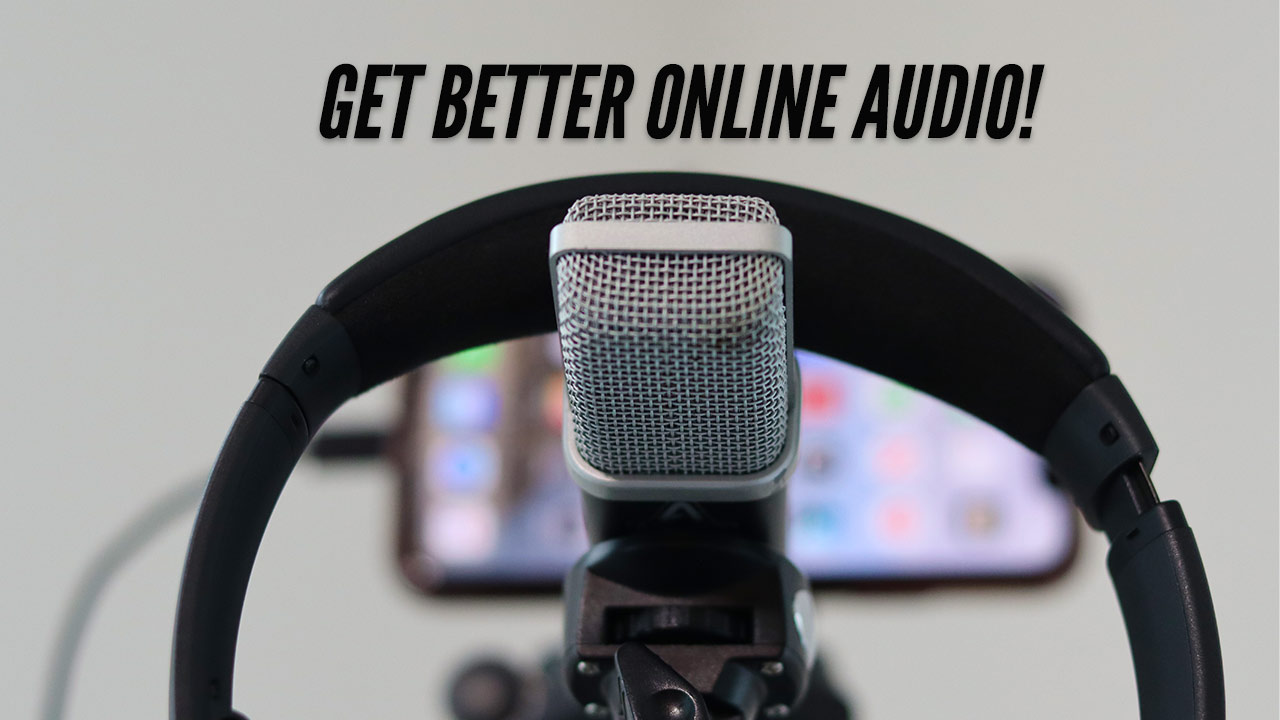
I got a lot of questions from folks about gear, so I thought it would be helpful to do a deep-dive on my favorite audio devices for online lessons.
Zoom Handy Recorder: my favorite device for capturing good audio
Zoom has been around for 30 years and builds rock-solid products. They’re extremely popular with musicians, videographers, and podcasters, and I’ve always found them to be easy to use and sturdily built.
My personal favorite is the Zoom H6, but the H4n and H5 have most of the same features and will work wonders for people teaching online.

About H4n, H5, and H6 Zoom Recorders
All Zoom recorders have external mics at the front of the device. The H4n, H5, and H6 also allow you to plug in external mics using XLR cables.
The H4n, H5, and H6 also offer phantom power, so you can plug in traditional mics via XLR and have the device power them.
You can also plug in 1/4 “ jack cables to these inputs. That means that you can feed your amplifier output directly into the H6—an essential feature for electric bass teachers.

Having the ability to take a 1/4″ jack opens up a ton of possibilities for the music teacher. Using an adapter, you can plug an external device like an iPhone or iPad into the Zoom.
The sky’s the limit when you do this:
- record your student and play it back so you both can analyze it
- play musical examples
- use a variety of musical apps (drum machines, drones, pianos, etc.)
- plug in an electric keyboard
The H4n, H5n, and H6 all function well as an audio interface for your computer. When you plug in your device, you have the option for it to function as an SD card reader or as an audio interface.
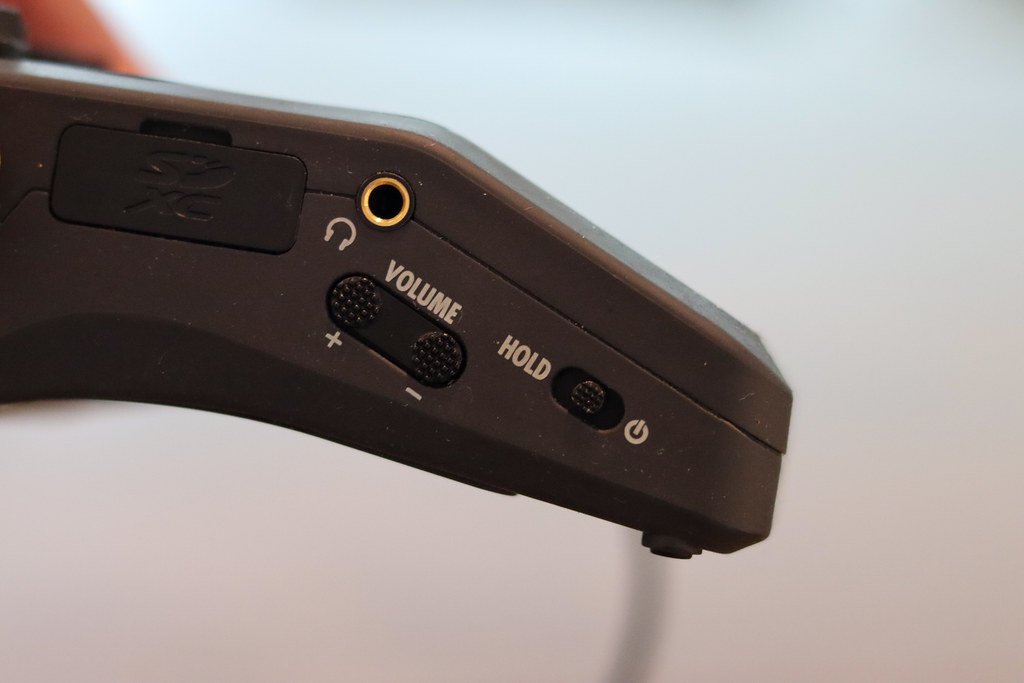
There’s a headphone jack and volume on the device that allows you to hear yourself and your student without needing to plug into your computer with headphones.

While the H4n doesn’t work as an iOS audio interface, as long as you have the Apple Camera Connection Kit, both the H5n and H6 are compatible and do an excellent job. You can choose to either draw power from your iPhone or iPad, or you can use the AA batteries in the device itself.
H4n, H5, and H6 comparison
While all three devices have similar basic features, there are some nice additions to the pricier H5 and H6. I’ll link to each of these models in the description below along with a price range, and I imagine you can find a refurbished one for less.
H4n – $200-240
Features
This is the most basic version of the three, but it packs quite a punch in terms of features. The H4n can be run on two standard AA batteries, and you can also draw on your computer as a power source when plugged in.
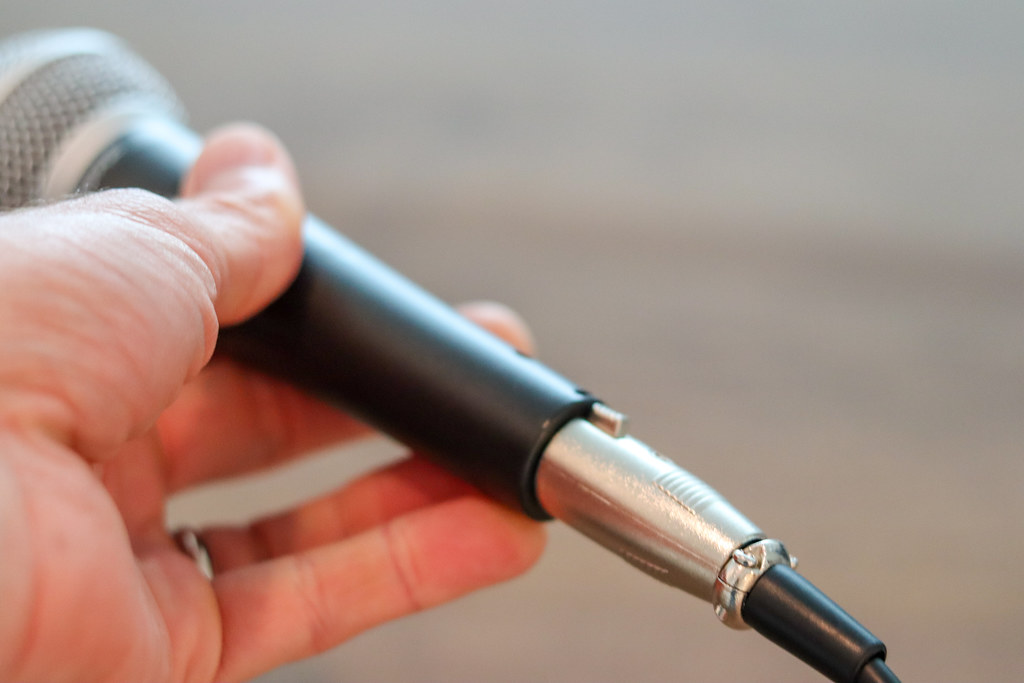
There are two inputs for either an XLR cable or 1/4” jack. In an online teaching situation, this allows you to keep the H4n on your instrument and also plug in an XLR mic like a Shure SM58. Your student (and your back!) will thank you for this gear add-on.
You can’t use this one as an iOS audio interface, unfortunately, but it’s great when plugged into the computer.
H5 – $270-280
Features
The H5 is quite similar to the H4n in terms of features. The build quality is a bit higher in my opinion, and I really like the volume control knobs for the tracks as opposed to the up/down sliders on the H4n.
The big difference between the H4n and the H5 is the mic capsule. The mic capsule that comes with the H5 is very similar to the built-in one on the H4n, but it is detachable, meaning that you can swap it out with other mic capsules that Zoom makes.
H6 – $305-350
Features
The H6 has the most inputs of all the Zoom audio recorders, and it has a big color LCD screen that allows you to easily monitor the levels of your instrument and your voice.
It has the best build quality of all, and the knobs and controls are just like new even after well over 1000 hours of use, being thrown in all kinds of bags, pulled out and tossed around at airport security, and the like.
It’s remarkable how versatile this device is with these additional features, and having the bigger color LCD screen makes it easy on the eyes when you’re using it for an extended period of time.
Setting up your gear
1. To use your device as an audio interface, plug it into your computer using a mini USB cable. I like to use a relatively long cord (five feet seems to work well) so that I can have some distance between myself and my laptop.

2. Turn on your Zoom device by sliding down on the hold/power button.
3. Using the selector button on the right side of the device, choose audio interface and then press the selector button to confirm.


4. Choose Stereo Mix.

5. Feel free to choose the power source you prefer, but I typically choose PC/Mac so that I don’t drain the AA batteries in my H6.

6. Make sure that your mic capsule is connected, and ‘arm’ the mic capsule by pressing the L and R buttons on the top of the device. If red lights are showing above them, you’re good to go.

Put the Zoom on a tripod (I use this small ‘selfie stick’ tripod, but any tripod will work)
8. Play a few notes on your instrument and check the levels. Use the volume knob on the mic to dial in a setting that doesn’t go into the red when you play loudly.
9. Using an XLR cable, plug in the mic for your voice to one of the audio inputs on the side of the device. I use a Shure SM58, but there are a lot of good options out there.


10. Arm the input for this mic and check your levels.
11. Put the mic on a microphone stand. I use one with a telescoping arm so that I can get the mic close to my mouth and not be bumping the mic stand with my now.
12. Plug your headphones into the Zoom and adjust the volume. I’m a big fan of Audio Technica M50x headphones. They sound great and have a lot of flexibility in terms of how you wear them and the cords that they provide.

13. In your audio program of choice (Skype, Zoom, FaceTime), make sure that you select your H4n, H5, or H6 as your audio input and output.
FaceTime Settings
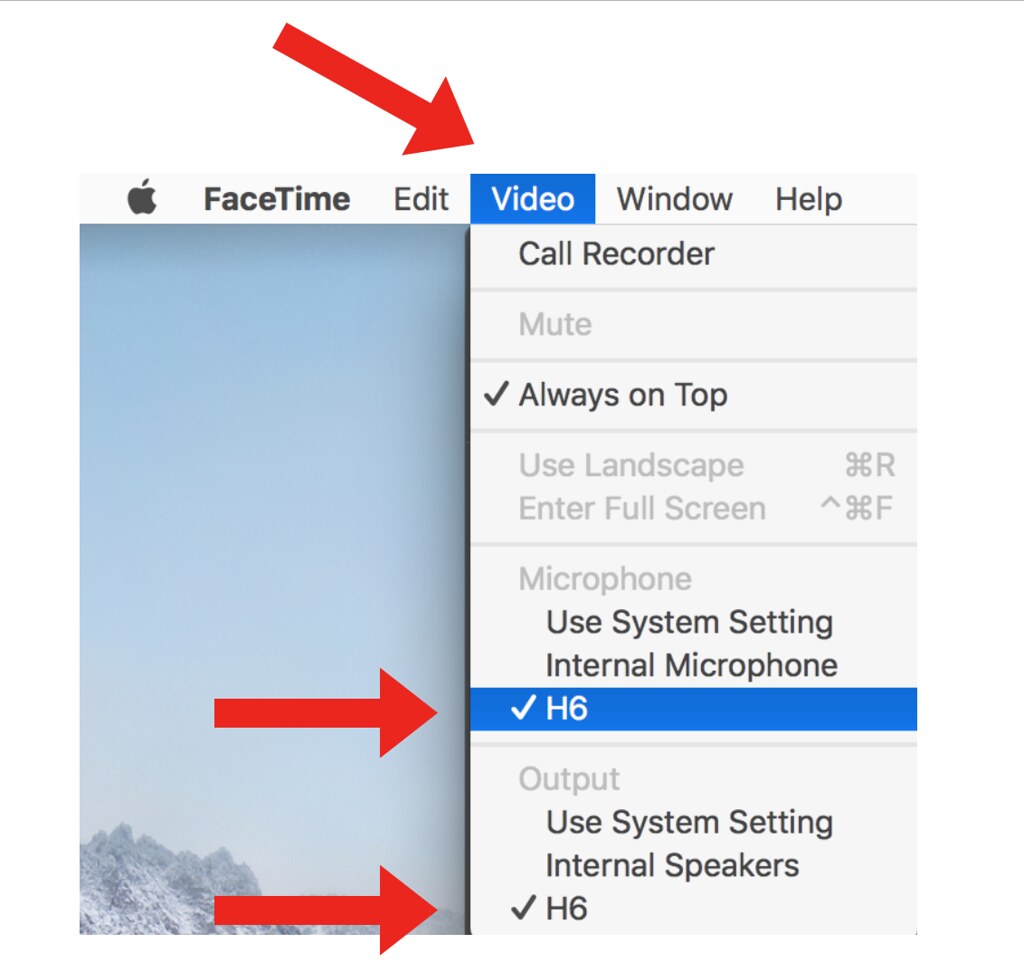
As far as I know, there’s no way to turn off auto gain control for FaceTime.
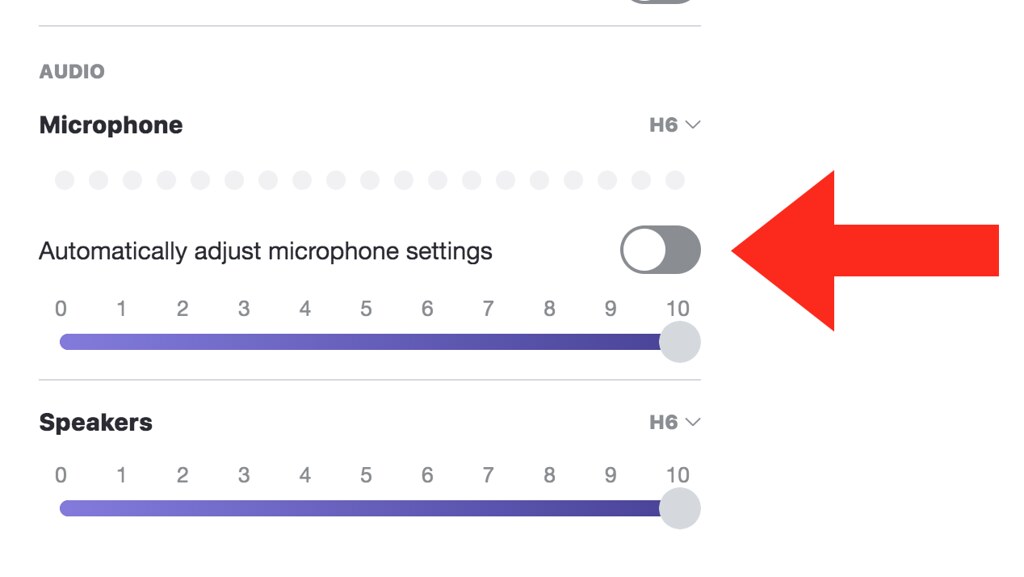
Skype Settings

Make sure to turn off ‘automatically adjust microphone settings’ to avoid the program raising and lowering your volume. You can also adjust the microphone and speaker level here, but I typically just do that on my Zoom H6.
Zoom Settings
I usually recommend testing the speaker and microphone to make sure that the H6 is selected.


Getting your audio configured correctly in Zoom is a little funky, but this excellent blog post has step-by-step instructions for that.
Adjusting to using this gear
It may feel strange at first to have that cord dangling down from your headphones, though musicians have been dealing with that for decades in the recording studio with no problem.
It may also feel weird hearing your own voice and instrument coming back at you in your headphones.
My suggestion is to give that some time. It can be a good thing to hear yourself in the mix like that, and many folks I’ve talked to feel that it actually makes for a better flow and exchange between people.
Actually, I find that I’m much more aware of talking over someone when I can hear myself in the mix, so I tend to be a better listener and a little more considerate. Strange, but true.
Additional uses for your Zoom
Zoom recorders are really useful in a variety of contexts, so you’ll likely find uses for them way beyond just online teaching.
With all its inputs, the Zoom H6 is particularly expandable, which is one of the reasons that I’m such a fan of it. I’ve used it to record hundreds of episodes for my podcast, sometimes in person with all four XLR inputs plus the mic capsule. All of these tracks can be recorded as separate audio tracks, giving me a huge amount of control in the post-production.
It can also be used to:
- record live performances
- serve as a wicked mixer-on-the-go for recording projects
- get great audio for videography
Who knows when we’ll get back to recording live performances, of course. The point is, the Zoom has a lot of uses besides just a teaching tool, so spending the bucks instead the cheapest possible option may be well worth it in the long run.
Recommendations for your students
The Zoom with an additional mic and some headphones will work wonders for your sound… but there’s still the problem of the audio quality of your students! This is a real issue for bass students since the frequencies are so low.
Student microphone
I’ve been getting good reports from teachers about this USB mic. It’s around $30 and comes with a scissor arm stand, which is great for getting the mic closer to their instrument.
I haven’t tested this with any bass students, so I can’t vouch for how well it performs with the very low frequencies. If you try it out or have another recommendation, let me know!
If your student is using a Chromebook, they should be fine with this (or any other) USB mic.
If they’re using an iPhone or iPad, they’ll need the Lightning to USB Camera Adapter to make the USB mic work. Also, not all USB mics work with this device, especially the ones that need a lot of power to operate.
Student headphones
You also want to have them wear headphones. Of course, this makes it hard for them to hear themselves. I find that slipping my left headphone bit off of my left ear lets me hear my bass and also still hear them well.
For your students, I think it’s fine to have them wear bluetooth headphones. That way, they don’t have to worry about the cord dangling down or positioning themselves in front of their computer.
Consolidated Gear Recommendations
I – For you
- Zoom device (audio interface + mic for your instrument):
- Tripod for your Zoom:
- Microphone for your voice:
- Shure SM58 – $99
- XLR cable:
- lots of options like this for around $5-10
- Microphone stand for your Shure:
- long USB mini cable:
- lots of options like this for around $3-5
- Headphones:
- Audio Technica M50x – $130-150
Total: $475-650 (or less, if you already own some of this stuff)
II – For your students
- Microphone:
- Neewer USB Microphone and stand – $30-35
- Headphones:
- Mpow Bluetooth Headphones – $20-25
- if using iPhone or iPad:
Total: $50-90 (or less, if they have headphones that work)
If that seems like a chunk of change… well, it is. There’s no way to sugar-coat it. You get what you pay for, and quality gear is not going to be a super bargain.
So… start with one thing. Maybe get that H4n. Hook it up, get comfortable, and use that for a couple of weeks. Even that one thing will totally change the game for you.
Then get that second mic a few weeks later. After hours of craning down to talk to your student with just one mic, your back will thank you for this add-on,
Maybe use your old headphones for a while, and grab a higher-quality pair a month down the road.
Offer your students the same advice. Have them get a USB mic and use any headphones they have. Getting them on a better mic will change the game on your end for sure.
Final Thoughts
All of this is an investment, both for you and your students. As I mentioned in my previous blog and video, you can get started with your phone or laptop and no additional gear.
If we’re all in this pandemic reality for the long haul, though, you’re probably going to be going out of your mind with the bad audio quality of a non-microphone and headphone setup.
As music teachers, we want to improve our audio before anything else. If you’re going to invest in something, invest in that first!
Let me know if you’ve got any other thoughts or recommendations—let’s all help each other to get through this, and we’ll all probably emerge with a bunch of new skills that we can apply down the road!
Bass News Right To Your Inbox!
Subscribe to get our weekly newsletter covering the double bass world.
Excellent advice! Thank you… m
You bet, Marcel!
Thank you, Jason. Stay safe.
You too!
Thanks Jason. The earbuds are killing my ears!
Stay safe!
The earbuds get old, don’t they? My Audio Technicas are a life-saver for me!